
Fourier Hobbyist, Episode 1: Multi-Mode Robot from RC 4x4
Espisode 1: Multi-Mode Robot from RC 4x4
This post accompanies this Fourier Automation video.
Project Description:
This playlist will walk the viewer through an intermediate / advanced home hobbyist robotics project. This project will be free-form and enthusiastic beginners may also enjoy it.
We will convert a large, inexpensive RC 4x4 vehicle to a multi-modal autonomous rover.
Note: Our robot won't have any actual RC capabilities after the first stages -- it will be better and more exciting than that. We will use the term "pseudo-RC" to refer to this style of control where user input will be intercepted and interpreted by the microcontroller before being transmitted to the motors / servos.
Here are the features we will build into our robot:
- IR Proximity Sensors
- (Optional) GPS navigation
- Multiple modes
- Idle Mode:
- Steering tests (pseudo-remote control)
- Pseudo-Remote Control Mode:
- RC Transmitter communicates with microprocessor and microprocessor interprets and makes adjustments and send commands to the motors and servos.
- (Optional) Object Avoidance.
- Autonomous Mode:
- Robot acts autonomously
- Object Avoidance
- (Optional) Robot uses data from GPS module to navigate toward a specific waypoint or series of waypoints.
Parts List:
Economy: We understand that hobbyists (young or old) may not be swimming in funds they can spend on a hobby robitics project. What that in mind, we've given careful thought to reducing project costs without sacrificing learning or scalability.
Target Vehicle (Large RC 4x4): $20 - $75
You choose the vehicle. We're looking for a LARGE (18" - 20" min), inexpensive RC 4x4 toy. You can find these used on Ebay.
Tip: We'll be ripping out and tossing away the electronics and batteries, so ... you might look for one on Ebay that is used and missing it's remote.
Here are 2 vehicles I acquired for this prototype project:


Remote Control Tx/Rx Pair: $49
We recommend the (Amazon link) FlySky i6x Tx/Rx bundle: FlySky's i6 series transmitters and receivers are economical, reliable, and just plain feel good to use. We have relied on this equipment for multiple projects in the past and it has never let us down.
We recommend sticking with a transmitter that has at least 6 channels as we will want auxiliary channels that switch discretely between fixed positions. We will use these aux. channels later in the project for things like operating mode (Idle / RC / Autonomous). A 4-channel transmitter may be limiting for you as you build out this project.
For other FlySky products and support, visit their website.
Motor Driver: $60
You may find less expensive motor drivers, but check their power carefully before substituting. And check for a Lithium battery voltage cutoff to protect your batteries.

Here's a link to the (Mfgr. link) Sabertooth 2x5 Quick Start Guide (.pdf).
And here's the (Mfgr. link) Sabertooth 2x5 Detail Manual (.pdf).
Arduino Board: $25 - $50
(Be sure to research the latest revisions of each Arduino product you're buying.)

If you want to minimize your costs and get started on this project, the (Amazon link) Arduino Uno (R4 Wifi) would be a good choice (above).
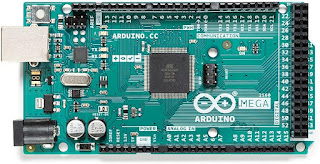
If you would like the flexibility to use this Arduino for bigger, more complex projects, the (Amazon link) Arduino Mega 2560 may be a better choice (above).
Arduino IDE: Free

Lipo Batteries: $38 - $76
You'll want to buy a pair of high-energy-density batteries. Lipo batteries are the best for energy density. But they are expensive.
I'm suggesting 14.8v Lipo batteries. The motors and electronics of our project may only require 9.0VDC, but you may want to add lights or heater ... or hijacked automotive parts that require 12VDC. I'm suggesting 14.8V batteries so that your creativity won't be limited in the future.
I suggest a pair so that you always have a spare that's either fully charged or charging as you are using the other. This way your work won't be interrupted.
Please do some investigation and comparison shopping on your own. The batteries that I bought were overkill and are no longer available.

If you want to save some money, or if above area unavailable, try these (We've never purchased these, but they have a decent rating on Amazon)

Lipo Charger: $24
Lithium polymer batteries require a special charger. Here's the one I got that I'm very happy with. It charges a variety of Lipo batteries at varying speeds. (Please follow recommended safety precautions of your supplier when charging Lipo batteries.)

Banana Connectors: $10
Olyin Banana Connectors w/ pigtails: https://www.amazon.com/gp/product/B074Z1MHBX/
Buck Converters: $8
A "buck converter" is an inexpensive, adjustable electronic component that simply drops a variable DC input voltage to a specific, configurable lower DC voltage. Just as an example, my project uses one of these devices to drop the 14.8VDC battery voltage to 10VDC for the motors and Arduino board. Then I use another buck converter to drop the voltage to 5VDC for other electronic components and for the signal voltage fed into the Arduino.
Unlike old-school voltage regulators, they don't do this by channeling the excess voltage to heat (wasting it). Instead, they switch on/off at a very high frequency to output a stable lower DC voltage.
Generic buck converters (5-pack): https://www.amazon.com/gp/product/B07PDGG84B
Proximity Sensors: $10 - $15
We recommend this pair of IR proximity sensors because they are a higher grade sensor that comes in a self-contained module. They are marketed (believably) as being more stable and reliable in both darkness and bright sunlight. My limited experience with them seems to corroborate this statement. Although, keep in mind, bright sunlight may still be a challenge for IR proximity sensors.
E18-D80NK IR Proximity Sensors: https://www.amazon.com/gp/product/B08HK6KS6T
If you really want to cut costs and you have no intention of using your robot outdoors, then you can rely on these very inexpensive IR prox. sensors. But be warned, they are subject to squirrely behavior even in varying indoor lighting. I would not expect them to be useful in direct sunlight at all. But they are perfect for internal devices like the tachometer that I put under the chassis of my robot.
Frienda IR Proximity Sensors: https://www.amazon.com/gp/product/B08DR1W3BK
(OPTIONAL) GPS Module: $13
This item is optional. I'm not sure you will go so far as to put a GPS module on your robot, but if you do, this would be a great module to start with.
NEO-6M is the most popular GPS module in the Arduino community. This means there are more helpful resources and code samples available for you to rely on when things get tough.


Comments
Post a Comment